
Within the dynamic world of cellular app growth, creating a personalised and interesting consumer expertise is essential. Flutter, a framework by Google for constructing stunning, natively compiled, multi-platform functions from a single codebase, has gained immense reputation for its flexibility and ease of use. If you wish to enhance the consumer’s engagement along with your Flutter cellular app, one of many choices is to supply the house display widget of your app, and the home_widget package deal from pub.dev is usually a game-changer for this objective.
What’s home_widget Package deal?
HomeWidget is a package deal that makes creating HomeScreen Widgets simpler on Android and iOS. HomeWidget doesn’t enable writing Widgets with Flutter itself. It nonetheless requires writing the Widgets with native code. Nonetheless, it offers a unified interface for sending information, retrieving information, and updating the Widgets. This package deal enables you to simply create and replace dwell widgets on the consumer’s dwelling display, offering a extra customized and interactive expertise.
Getting Began
Create a brand new Flutter venture and substitute the `important.dart` file with the beneath code –
import 'package deal:flutter/materials.dart';


void important() {
 runApp(const MyApp());
}


class MyApp extends StatelessWidget {
 const MyApp({tremendous.key});


 @override
 Widget construct(BuildContext context) {
   return MaterialApp(
     title: 'Flutter Demo',
     theme: ThemeData(
       colorScheme: ColorScheme.fromSeed(seedColor: Colours.deepPurple),
       useMaterial3: true,
     ),
     dwelling: const MyHomePage(title: 'Flutter Demo Dwelling Web page'),
   );
 }
}


class MyHomePage extends StatefulWidget {
 const MyHomePage({tremendous.key, required this.title});
 remaining String title;


 @override
 State createState() => _MyHomePageState();
}


class _MyHomePageState extends State {
 Record todo = ['TODO 1', 'TODO 2'];
 remaining TextEditingController taskNameController = TextEditingController();


 addTodo() {
   showDialog(
     context: context,
     builder: (BuildContext context) {
       return AlertDialog(
         content material: StatefulBuilder(
           builder: (context, setState) {
             return SizedBox(
               top: 200,
               baby: Column(
                 kids: [
                   const Text('Add new todo', style: TextStyle(fontSize: 22)),
                   const SizedBox(height: 24),
                   TextFormField(
                     maxLines: 3,
                     controller: taskNameController,
                     style: const TextStyle(fontSize: 14),
                     decoration: InputDecoration(
                       contentPadding: const EdgeInsets.all(20),
                       hintText: 'Task',
                       border: OutlineInputBorder(
                         borderRadius: BorderRadius.circular(15),
                       ),
                     ),
                   ),
                 ],
               ),
             );
           },
         ),
         actions: [
           ElevatedButton(
             onPressed: () => Navigator.of(context, rootNavigator: true).pop(),
             child: const Text('Cancel'),
           ),
           ElevatedButton(
             onPressed: () {
               if (taskNameController.value.text.isNotEmpty) {
                 setState(() {
                   todo.add(taskNameController.value.text);
                   taskNameController.clear();
                 });
               }
               Navigator.of(context, rootNavigator: true).pop();
             },
             child: const Text('Save'),
           ),
         ],
       );
     },
   );
 }


 @override
 Widget construct(BuildContext context) {
   remaining ColorScheme colorScheme = Theme.of(context).colorScheme;
   remaining Colour oddItemColor = colorScheme.major.withOpacity(0.05);
   remaining Colour evenItemColor = colorScheme.major.withOpacity(0.15);


   return Scaffold(
     appBar: AppBar(
       backgroundColor: Theme.of(context).colorScheme.inversePrimary,
       title: Textual content(widget.title),
     ),
     physique: ReorderableListView(
       padding: const EdgeInsets.symmetric(horizontal: 40),
       kids: [
         for (int index = 0; index < todo.length; index += 1)
           ListTile(
             key: Key('$index'),
             tileColor: (index + 1).isOdd ? oddItemColor : evenItemColor,
             title: Text(todo[index]),
             trailing: const Icon(Icons.drag_handle),
           ),
       ],
       onReorder: (int oldIndex, int newIndex) {
         setState(() {
           if (oldIndex < newIndex) {
             newIndex -= 1;
           }
           remaining String merchandise = todo.removeAt(oldIndex);
           todo.insert(newIndex, merchandise);
         });
       },
     ),
     floatingActionButton: FloatingActionButton(
       onPressed: addTodo,
       tooltip: 'Add Process',
       baby: const Icon(Icons.add),
     ),
   );
 }
}
Right here, we now have created a fundamental TODO app the place you may add todos and reorder them.
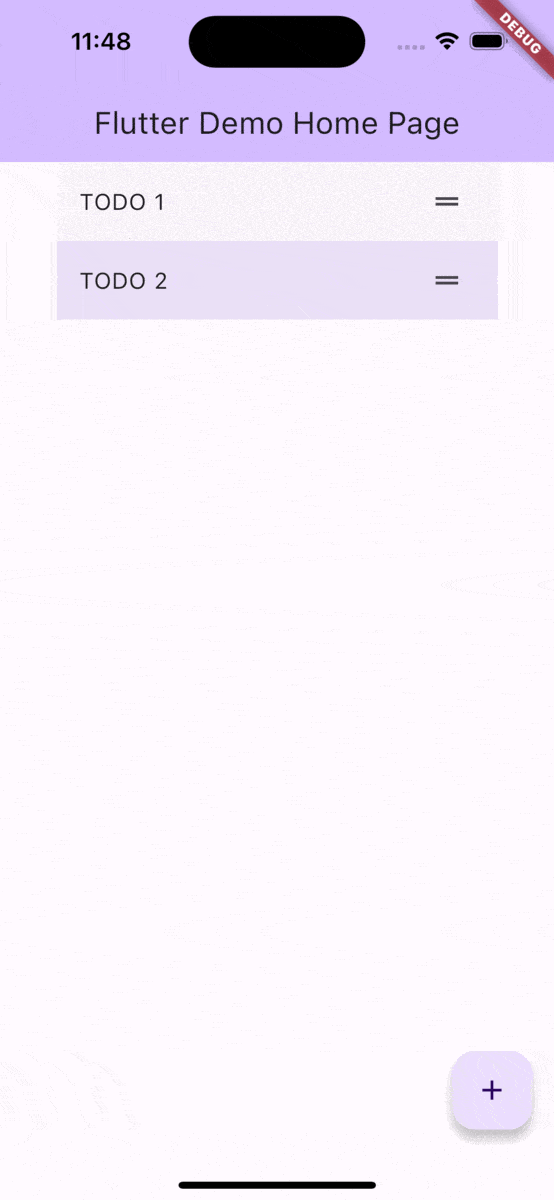
Now our goal is to point out the primary process from this TODO Record within the widget on the Dwelling display of the system. For that, we have to carry out the next steps:
- We’ll create a fundamental dwelling display widget for iOS and Android utilizing Xcode and Android Studio, respectively.
- We’ll write dart code to replace the content material for the widget utilizing the home_widget package deal.
- Including native iOS performance to point out up to date content material.
- Including native Android performance to point out up to date content material.
Making a fundamental iOS Dwelling Display widget
- So as to add a Dwelling Display widget in iOS, open the venture in Xcode.
- Choose File → New → Goal from the menu. This provides a brand new goal to the venture.
- A listing of templates seems. Choose Widget Extension.
- Sort “SimpleTodoWidget” into the Product Title field for this widget. Clear each the Embody Dwell Exercise and Embody Configuration Intent test bins and Activate.
- Xcode creates and updates a number of information. We’ll work on the related information later.
Replace your bundle identifier
In Xcode, navigate to the settings to your goal. Within the Signing & Capabilities tab, test that your group and bundle identifier are set.
Add the App Group to each the Runner goal and the SimpleTodoWidgetExtention goal in Xcode:
Choose + Functionality -> App Teams and add a brand new App Group. Repeat for each the Runner (guardian app) goal and the widget goal.
Making a fundamental Android Dwelling Display Widget
- So as to add a Dwelling Display widget in Android, open the venture’ in Android Studio.
- After the venture builds, find the app listing within the top-left nook. Add your new Dwelling Display widget to this listing. Proper click on the listing, choose New -> Widget -> App Widget.
-
Android Studio shows a brand new type. Add fundamental details about your Dwelling Display widget together with its class title, placement, measurement, and supply language
- Class Title field to SimpleTodoWidget
- Minimal Width (cells) dropdown to three
- Minimal Top (cells) dropdown to three
- Android Studio creates and updates a number of information. We’ll work on the related information later.
Including the Dart Code
Now, we now have the essential widgets created in Android and iOS. Please run and take a look at them. We’ll now write dart code to replace the content material for the widget utilizing the home_widget package deal.
To start utilizing the `home_widget` package deal, embrace it in your venture’s dependencies. Open your pubspec.yaml file and add the next line:
dependencies:
 home_widget: ^0.4.1
After including the dependency, run flutter pub get to fetch the package deal.
Replace the `important.dart` file with the next code –
import 'package deal:flutter/materials.dart';


// ADDED
import 'package deal:home_widget/home_widget.dart';


void important() {
 runApp(const MyApp());
}


class MyApp extends StatelessWidget {
 const MyApp({tremendous.key});


 @override
 Widget construct(BuildContext context) {
   return MaterialApp(
     title: 'Flutter Demo',
     theme: ThemeData(
       colorScheme: ColorScheme.fromSeed(seedColor: Colours.deepPurple),
       useMaterial3: true,
     ),
     dwelling: const MyHomePage(title: 'Flutter Demo Dwelling Web page'),
   );
 }
}


// ADDED
// TO DO: Change along with your App Group ID
const String appGroupId = '';
const String iOSWidgetName="SimpleTodoWidget";
const String androidWidgetName="SimpleTodoWidget";


class MyHomePage extends StatefulWidget {
 const MyHomePage({tremendous.key, required this.title});
 remaining String title;


 @override
 State createState() => _MyHomePageState();
}


// ADDED
void updateHeadline(String todo) {
 HomeWidget.saveWidgetData('todo', todo);
 HomeWidget.updateWidget(
   iOSName: iOSWidgetName,
   androidName: androidWidgetName,
 );
}


class _MyHomePageState extends State {
 Record todo = ['TODO 1', 'TODO 2'];
 remaining TextEditingController taskNameController = TextEditingController();


// ADDED
 @override
 void initState() {
   tremendous.initState();


   // Set the group ID
   HomeWidget.setAppGroupId(appGroupId);


   remaining newHeadline =
       todo.isNotEmpty ? todo.elementAt(0) : 'No process accessible';
   updateHeadline(newHeadline);
 }


 addTodo() {
   showDialog(
     context: context,
     builder: (BuildContext context) {
       return AlertDialog(
         content material: StatefulBuilder(
           builder: (context, setState) {
             return SizedBox(
               top: 200,
               baby: Column(
                 kids: [
                   const Text('Add new todo', style: TextStyle(fontSize: 22)),
                   const SizedBox(height: 24),
                   TextFormField(
                     maxLines: 3,
                     controller: taskNameController,
                     style: const TextStyle(fontSize: 14),
                     decoration: InputDecoration(
                       contentPadding: const EdgeInsets.all(20),
                       hintText: 'Task',
                       border: OutlineInputBorder(
                         borderRadius: BorderRadius.circular(15),
                       ),
                     ),
                   ),
                 ],
               ),
             );
           },
         ),
         actions: [
           ElevatedButton(
             onPressed: () => Navigator.of(context, rootNavigator: true).pop(),
             child: const Text('Cancel'),
           ),
           ElevatedButton(
             onPressed: () {
               if (taskNameController.value.text.isNotEmpty) {
                 setState(() {
                   todo.add(taskNameController.value.text);
                   taskNameController.clear();
                 });
               }
               Navigator.of(context, rootNavigator: true).pop();
             },
             child: const Text('Save'),
           ),
         ],
       );
     },
   );
 }


 @override
 Widget construct(BuildContext context) {
   remaining ColorScheme colorScheme = Theme.of(context).colorScheme;
   remaining Colour oddItemColor = colorScheme.major.withOpacity(0.05);
   remaining Colour evenItemColor = colorScheme.major.withOpacity(0.15);


   return Scaffold(
     appBar: AppBar(
       backgroundColor: Theme.of(context).colorScheme.inversePrimary,
       title: Textual content(widget.title),
     ),
     physique: ReorderableListView(
       padding: const EdgeInsets.symmetric(horizontal: 40),
       kids: [
         for (int index = 0; index < todo.length; index += 1)
           ListTile(
             key: Key('$index'),
             tileColor: (index + 1).isOdd ? oddItemColor : evenItemColor,
             title: Text(todo[index]),
             trailing: const Icon(Icons.drag_handle),
           ),
       ],
       onReorder: (int oldIndex, int newIndex) {
         setState(() {
           if (oldIndex < newIndex) {
             newIndex -= 1;
           }
           remaining String merchandise = todo.removeAt(oldIndex);
           todo.insert(newIndex, merchandise);


           // ADDED
           if (newIndex == 0) {
             updateHeadline(merchandise);
           }
         });
       },
     ),
     floatingActionButton: FloatingActionButton(
       onPressed: addTodo,
       tooltip: 'Add Process',
       baby: const Icon(Icons.add),
     ),
   );
 }
}
Replace the iOS code to show the duty
Open the `SimpleTodoWidget.swift` file in Xcode:
Change the SimpleEntry struct with the next code:
// The date and any information you wish to go into your app should conform to TimelineEntry
struct SimpleEntry: TimelineEntry {
   let date: Date
   let process: String
}
This SimpleEntry struct defines the incoming information to go into the Dwelling Display widget when up to date. The TimelineEntry sort requires a date parameter
Edit SimpleTodoWidgetEntryView to show the Process:
struct SimpleTodoWidgetEntryView : View {
   var entry: Supplier.Entry


   var physique: some View {
       Textual content(entry.process)
   }
}
Edit the Supplier to inform the Dwelling Display widget when and the way to replace
struct Supplier: TimelineProvider {
   func placeholder(in context: Context) -> SimpleEntry {
       SimpleEntry(date: Date(), process: "Placeholder Process")
   }


   func getSnapshot(in context: Context, completion: @escaping (SimpleEntry) -> ()) {
       let entry: SimpleEntry
       if context.isPreview{
           entry = placeholder(in: context)
       }
       else{
           // Get the info from the consumer defaults to show
//            let userDefaults = UserDefaults(suiteName: )
           let userDefaults = UserDefaults(suiteName: "group.todowidget")
           let process = userDefaults?.string(forKey: "todo") ?? "No process accessible"
           entry = SimpleEntry(date: Date(), process: process)
         }
       completion(entry)
   }


   //    getTimeline is known as for the present and optionally future occasions to replace the widget
   func getTimeline(in context: Context, completion: @escaping (Timeline) -> ()) {
       //This simply makes use of the snapshot operate you outlined earlier
       getSnapshot(in: context) { (entry) in
           let timeline = Timeline(entries: [entry], coverage: .atEnd)
           completion(timeline)
       }
   }
}
Remark out the SimpleTodoWidget_Previews
//struct SimpleTodoWidget_Previews: PreviewProvider {
//    static var previews: some View {
//        SimpleTodoWidgetEntryView(entry: SimpleEntry(date: Date()))
//            .previewContext(WidgetPreviewContext(household: .systemSmall))
//    }
//}
Save all information and re-run the app and widget goal. Now you can see the First Process of the TODO listing of your Flutter app within the widget on the Dwelling Display.
Replace the Android code to show the duty
Open the res/structure/simple_todo_widget.xml file. It defines the construction and structure of your property display widget. Choose Code within the prime right-hand nook and substitute the contents of that file with the next code:
<RelativeLayout xmlns:android="http://schemas.android.com/apk/res/android"
   type="@type/Widget.Android.AppWidget.Container"
   android:layout_width="wrap_content"
   android:layout_height="match_parent"
   android:background="@android:coloration/white"
   android:theme="@type/Theme.Android.AppWidgetContainer">


   <TextView
       android:id="@+id/appwidget_text"
       type="@type/Widget.Android.AppWidget.InnerView"
       android:layout_width="wrap_content"
       android:layout_height="wrap_content"
       android:layout_centerHorizontal="true"
       android:layout_centerVertical="true"
       android:layout_margin="8dp"
       android:background="@android:coloration/white"
       android:textual content="Placeholder Process"
       android:textSize="24sp"
       android:textStyle="daring|italic" />
</RelativeLayout>
This XML defines one textual content view to show the Process. We have to open the `SimpleTodoWidget.kt` file to replace its performance. On this file, we have to modify the onUpdate technique. Android calls this technique for widgets at fastened intervals. The home_widget package deal tells Android to name onUpdate every time we name updateWidget within the dart code. Change the onUpdate technique with the beneath code –
override enjoyable onUpdate(context: Context, appWidgetManager: AppWidgetManager, appWidgetIds: IntArray) {
   // There could also be a number of widgets lively, so replace all of them
   for (appWidgetId in appWidgetIds) {
       // Get reference to SharedPreferences
       val widgetData = HomeWidgetPlugin.getData(context)
       val views = RemoteViews(context.packageName, R.structure.simple_todo_widget).apply {


           val title = widgetData.getString("todo", null)
           setTextViewText(R.id.appwidget_text, title ?: "No process accessible")
       }


       appWidgetManager.updateAppWidget(appWidgetId, views)
   }
}
And ensure so as to add the beneath import within the imports part
import es.antonborri.home_widget.HomeWidgetPlugin
Save all information and re-run the app and widget goal. Now you can see the First Process of the TODO listing of your Flutter app within the widget on the Dwelling Display.
You may additionally learn: Beacon Know-how – A Recreation Changer for Cell App Improvement
Conclusion
The home_widget package deal in Flutter is a robust device within the realm of {custom} cellular app growth. It empowers builders to handle dwelling display widgets, thereby providing a extra customized and interactive consumer expertise. By integrating this package deal into your Flutter app, you may simply construct and replace widgets on the consumer’s dwelling display, enhancing general engagement. Experiment with the offered examples, and begin making a extra dynamic dwelling display expertise to your customers in the present day! For a extra in-depth exploration, you may entry the supply code right here.
Searching for skilled Flutter growth providers? Your search ends right here! Our group, composed of extremely expert and skilled builders, is devoted to delivering top-notch, custom-tailored options to your wants. Excited by exploring how we might help along with your venture? E-book a name with us in the present day to get began!